
11 KiB
Agent Utility
Introduction
This document aims to introduce the agent utility concept and provide an instruction on adding custom agent utilities in AI project “BotSharp”. We will start by explaining the mechanism of agent utility in Section 2. Then, we illustrate the custom agent utility setup and integration in Section 3 and Section 4, respectively. A use case will be demonstrated in Section 5. We wrap up the document with a short summary.
Agent Utility
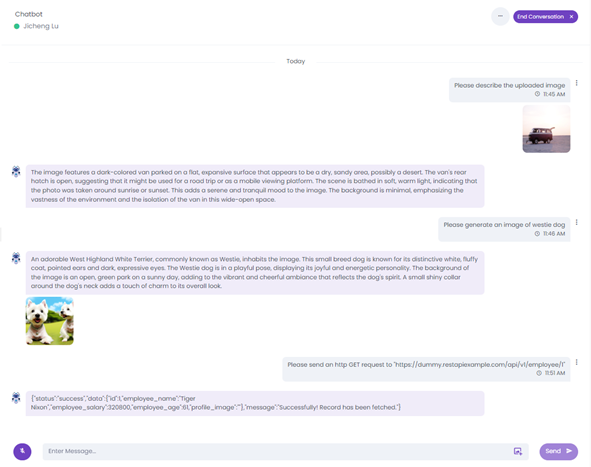
The agent utility is a unique feature that can be integrated into agent to enhance its capability. Its core principle is that it can dynamically and seamlessly add extra prompts and add task-oriented functions (or tools) during conversation, without disrupting the agent’s primary purpose. In other words, the agent utility can perform extra tasks based on the context of conversation. Typical examples of agent utility include reading images/pdf, generating image, and sending http requests. Fig 2.1.1 demonstrates an example of these utilities. In this example, “Chatbot” is a simple agent to answer user questions and the utilities extend its capability to explain image content, generate requested image, and send a specific http request.
Agent Utility Setup
In this section, we outline the steps to set up a custom agent utility. We start with the basic code structure and then add essential utility data, such as prompts and functions. The utility hooks are used to incorporate the utility into the agent. Finally, we give a brief overview of the utility implementation.
Basic Code Structure
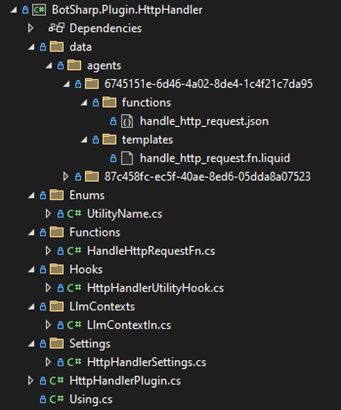
The basic code structure of a typical agent utility includes prompt/function data, hooks, and function implementation. We can add specific utility prompts and functions in different projects. Note that the agent “6745151e-6d46-4a02-8de4-1c4f21c7da95” is considered as a dedicated utility assistant, and every prompt and function can be optionally used as a utility. Fig 3.1.1 presents the prompt, function, hooks, and implementation of an http utility.
Utility Data
For a typical agent utility, it is essential to add at least a prompt and a function. The prompt is added under the “templates” folder and its recommended name is “[function name].fn.liquid”, while the function is added under the “functions” folder and its recommended name is “[function name].json”. Once we compile the project, we can find the aggregated utility assistant folder at location: “\BotSharp\src\WebStarter\bin\Debug\net8.0\data\agents\6745151e-6d46-4a02-8de4-1c4f21c7da95”.
Utility Hooks
The utility hooks are used to connect the agent utility to the agent system. Fig 3.3.1 demonstrates an implementation of the http utility hook, where we define the utility name, prompts and functions. Note that each utility can be used across different agents.

The agent hook is used to append the utility prompt and function during the conversation. Note that the utility data is only allowed to be included in the context of conversation. The utility mechanism is implemented in the “OnAgentUtilityLoaded” hook, and it is invoked when we load any agent.


Utility Function Implementation
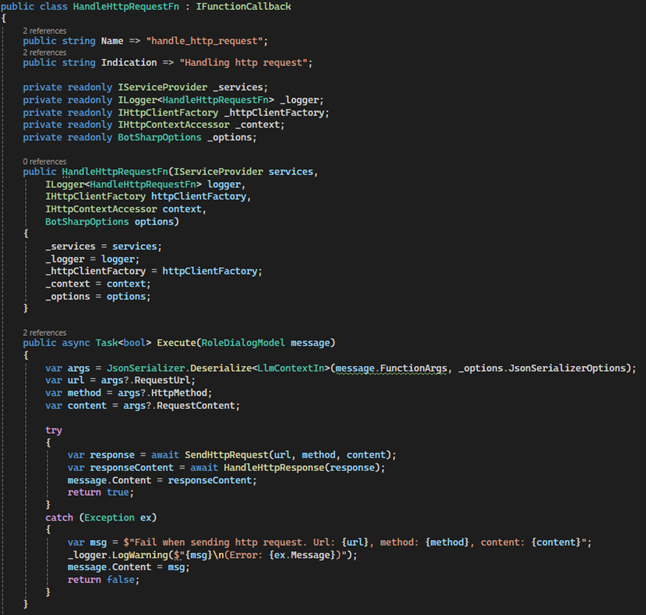
Here we introduce a simple utility function implementation. The actual content depends on what task you want this utility to fulfill. Fig 3.4.1 illustrates the implementation of the “handle http request” function. Note that the property “Name” must be consistent with the function added in the utility data. Here we introduce a simple utility function implementation. The actual content depends on what task you want this utility to fulfill. Fig 3.4.1 illustrates the implementation of the “handle http request” function. Note that the property “Name” must be consistent with the function added in the utility data. The “Indication” is an optional property whose content will be displayed in the chat while the user is waiting for the assistant response.
Utility Inheritance
Here we introduce a new feature: utility inheritance. As we are using the routing-based multi-agent architecture, different agents may come into the call stack while we are handling user requests. With the utility inheritance, the agent can not only use the utilities added to itself but also inherit the utilities from the entry agent, which is the first agent that comes into the call stack, such as a router agent. Fig 3.5.1 illustrates a typical example of routing-based multi-agent architecture, where “Pizza Bot” is the router and "Order Inquery", "Ordering", "Payment" are task agents. When the user starts chatting, “Pizza Bot” first comes into the call stack, with "Order Inquery", "Ordering", or "Payment" joining next depending on what the user actually requests. For example, if we allow "Order Inquery" to inherit utilities, all the utilities from itself as well as “Pizza Bot” will be invoked once the "Order Inquery" agent is in action.

Agent Setup
Here we introduce the agent setup with utilities and inheritance. As we introduced in Section 3.3, each utility of an agent is structured with utility name, functions, and prompts. Fig 3.6.1 and Fig 3.6.2 presents the utility configuration and utility inheritance of “Pizza Bot” and “Order Inquery”, respectively. As is displayed, we can apply the utility configuration and inheritance via agent files or agent detail ui. Note that we can uncheck the box to disable a utility (Fig 3.6.1 right).



Agent Utility Integration
In this section, we outline the steps to integrate a custom agent utility, including registering plugin, registering assembly, and adding project reference.
Fig 4.1.1 presents the “Http Handler Plugin” in the “BotSharp.Plugin.HttpHandler”, where we can register the hooks and other essential settings. Note that there is no need to register the function here, since it is automatically registered on the application level.

Fig 4.1.2 shows the utility assembly registration in “appsettings.json”. It is important to note that we are required to add the project reference to the Startup project, e.g., WebStarter. Moreover, we are required to add any new custom agent utility in the “Plugin” folder instead of the “BotSharp” folder.

Use Case Demo
In this section, we demonstrate an http utility. After we set up and integrate the custom agent utility in backend, we can start the BotSharp-UI and go to any specific agent. Fig 5.1.1 shows an example of the “Chatbot” agent, where we can add any registered utilities in the highlight section.

Once we add the utility, we can initialize a conversation by clicking the bot icon at the top left corner. Fig 5.1.2 shows the conversation window, where we can find the number of utilities at the left panel. We can also click the agent name to go back to the agent page.

Here we use dummy rest APIs (source: https://dummy.restapiexample.com/) for the demo purpose. Fig 5.1.3 displays the various http requests sent in the conversation with “Chatbot”. We can see that the “Http Handler” utility has successfully extends the agent to send http request and receive response.

Summary
In this document, we introduce the agent utility concept and provide a step-by-step instruction on adding custom agent utilities in AI project “BotSharp”.
The agent utility is designed for enhancing the agent capability to perform dedicated tasks, such as sending http request, reading images, and generating images, by adding extra prompts and functions.
The agent utility setup and integration are explained step by step in Section 3 and Section 4, respectively.
We end up the document by demonstrating the Http utility, where we prove the utility can handle various http requests in the chat with agents.